Student Spotlight Article
Student Spotlight Article
changes and modifications.
prototype one.

My first prototype was a rough idea of the tool. I made sure to include everything I needed, but I was still unsure if the model would work with the machine or what parts would need to be changed to fit the needs of the technicians that would be using the tool. The first major change I made was the overall height of the tube to be able to print the tube in a more efficient way that would save materials. After making a physical 3-D copy of the first prototype, I took it to Olathe Medical Center to see what changes and modifications would need to be made to make the tool more functional.


The first time I attempted printing my project I used ploy-carbonate and it ended up not printing fully. I then decided to print all of my other prototypes in ABS plastic. This material is less durable but has a lower melting point and works better with our 3-D printer.


After printing the first prototype, I discovered that the back wall where the aperture would stop was too thin and would break easily so I made the wall thicker on the next design. I also noticed that the ring may have the same issue. I made the ring smaller and thicker for the next design to help fix this problem. After making a thicker aperture, it broke again so I decided to make a new design that was much more durable. The base tube worked well but needed to be changed to adapt to the new design ideas.


prototype two.
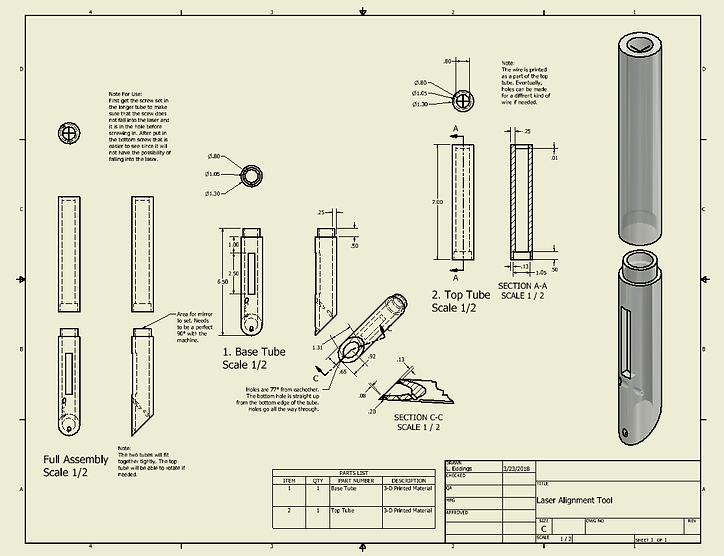
After 3-D printing the first prototype, I found several problems with the first design. The slot for the cross hairs was too small and could easily be broken. So I created a new design that was able to still have movable cross hairs but would not be as fragile. The new design consisted of two tubes that would fit on top of each other when the cross hairs were being used and they could be separated to be used with the mirror and have a clear field of vision. This new design also fixed the issue with the aperture sliding out of the slot a little and no longer being accurate and no longer being perfect centered. With the wires being built into the tubes it ensures that the center will stay fixed and slight movement will not impact the center since it is fixed to the lower tube.
Because I was able to go back to Olathe Medical Center before printing all of the pieces of the second prototype, I was able to see that the second prototype was too tall and there were changes that would need to be made to the top tube I had printed as well as the overall design.


prototype three.

The third prototype was made after my second visit at Olathe Medical Center. After meeting with the team again and testing out pieces from prototype one and two, we came up with several new ideas that would be more effective and solve some of the current problems with the other designs. The first thing that needed to be fixed was the holes and their placement. After getting more accurate measurements for the holes and their placements I updated their locations. We also discovered that they would need to order longer screws to connect the device because the current screws are too short to hold it in place. The new idea for the set screws and moveable aperture was Robin's idea. He thought it would be easier for him to maneuver and work with than the rigid built in version from prototype two. He gave me the ideas and guidance on how to make the tube easier to use and align on the machine for use.

Since my third design was made close to spring break, I was unable to bring the third prototype to Olathe Medical Center so I only sent them electronic files and simulations for feedback. We were able to print the top tube though and see how the screws would fit and if they were able to make their own threads in the plastic, which they were able to.
prototype four.

The fourth prototype did not have as many drastic changes as the other prototypes did. The design was mostly done by this point and there were just small changes that needed to be made. I got rid of the holes where it was to screw onto the machine and decided to make an inset extension of the tube to be the way to attach the tool to the machine. By doing this I eliminated the need to have the screws perfectly aligned and the worry that it may not always be perfectly centered on the tube. By making the tool insert directly into the machine, it eliminates the need to get new and longer screws for the part as well as make it easier to get a perfect angle with the machine. The small changes made in this prototype were mainly for ease of use and the overall function of the tool rather than the entirety of the design.


The fourth prototype worked very well and fit the machine when we took it to Olathe Medical Center. After talking with Robin about the design and how he would use it and the overall function, we decided that the fourth prototype would be the final design for the project.